deneme bonusu veren siteler deneme bonusu veren siteler bahis siteleri

CHOOSING WHO TO DO BUSINESS WITH

Posted On: August 17, 2018


The Paper Trail

When having work performed consider the differences.

Good shop: When you drop off your boat, expect an accurate work order (the initial paperwork describing what's wrong) with a realistic estimate. The nature of boats means that sometimes repairs on one thing will reveal further problems somewhere else. An estimate is just that, but a good shop will have realistic knowledge of how long most repairs take. When completed, a repair job includes a comprehensive invoice (final bill) detailing all labor, parts, and miscellaneous charges.

Not so good shop: i have seen many complaints with work orders that say nothing more than "fix engine." Such an open-ended work order is bound to end up


HOW DO YOU FIND A GOOD SHOP?

Look Online

Internet reviews make it easier to find shops that do quality work. Online review sites such as Yelp and Google can be helpful in choosing a repair facility. But look carefully — a single dissatisfied customer can carpet the internet with negative reviews. Look also at the reviewers' names. Real names carry more weight than fastboatguy98. Shops with several good reviews that go back a few years are a better bet.

Anyone can throw up a website, and many shops do just that with whichever volunteer is willing to step up. But a shop that goes the extra mile by including short articles or blogs about relevant topics, as well as matters such as hours, emergency numbers, and specials — and keeps it up to date — shows it understands what people expect today.

0

SOME LESSONS LEARNED

Posted On: August 13, 2018

Not Sea-Trialing The Boat After Repairs Are Made

A client purchased a used powerboat with a large outboard that had a cracked head. Because he wrote into the contract that the engine had to be working before he would buy the boat, the dealer had the engine fixed and claimed they performed a compression test to verify everything was fine. After paying for the boat, the first time the new owner took the boat out, the rod blew a hole in the side of the engine. The dealer he bought it from first said he'd replace it with a used engine, but eventually said that the contract stated that boat was purchased in "as-is" condition and was working on the day of the sale.

Lesson: When contingencies are written into a contract, spell out the details and don't formally accept the boat until you've verified that all repairs have been made properly. Because of the high value of the engine, it would have made sense to have an independent technician check it out and even come along for a sea trial.

Not Allowing A Shop To Attempt To Honor Their Warranty

A client took his family out for a Memorial Day weekend trip when the inboard engine in his boat quit. In hopes of getting the boat fixed quickly to get back out on the water as soon as possible, he scanned the newspapers to find a repair shop. The shop he chose found water in the engine, estimated the repair at $1,500, and said it would have to send the head out for reconditioning.

When the member got the boat back and the engine was still not working, he lost confidence in the shop handling the repair and immediately took the boat to another shop, which fixed it. The member contacted the original shop to ask for his money back or have them reimburse him for the additional work. It refused, saying they were given no opportunity to correct the problem.

Lesson: Pick a shop carefully. Warranty law allows a shop to be given the opportunity to correct a problem. If you take your boat to another shop for further work, the first shop will have no obligation to refund your money or pay for extra work.

0

USING THE RIGHT SEALANT

Posted On: August 10, 2018

Boat Sealants

Based on an article by Don Casey                                                                                      

Perfect technique can't make up for the wrong sealant. If you really want to stop that leak, start by getting the sealant right.

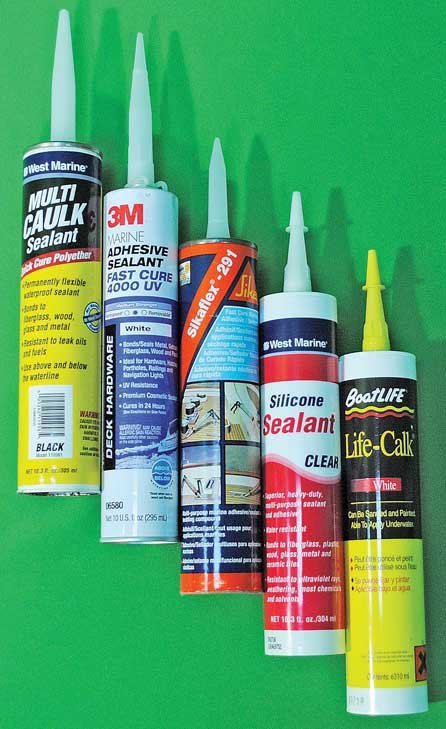
Doing the job right starts with using the right sealant. Picking the wrong sealant can cause a host of problems from early failure to not being able to free a fitting if necessary. Some sealants will never bond to plastic; others deteriorate when exposed to chemicals. Choose the wrong sealant and, at best, you'll be doing this job again next year. At worst, you'll have to destroy some of your deck to free a cleat.

Unfortunately, the manufacturers don't make it easy to figure out what sealant will work best for your particular project. Well-stocked marine-supply stores have four types of sealant on their shelves — polyurethane, polysulfide, polyether, and silicone — most of which say only "marine sealant" or maybe "adhesive sealant." An additional sealant worthy of consideration will not even be on the shelf. Rather than a gooey paste applied with a nozzle, butyl tape is a sticky solid pressed into position (see sidebar).

The best-known modern marine sealant, 3M 5200, a polyurethane, has a well-deserved reputation for unsurpassed strength and tenacity that makes it the go-to sealant. But, as you'll see below, for many applications, including bedding deck hardware, another product would be a wiser choice. Formulated for cohesive failure (the sealant fails before the bond releases), 3M 5200's tensile strength of 700 psi (pounds per square inch; the force necessary to pull the bonded pieces apart) means it can take more than 5 1/2 tons of force to separate a 4-inch stanchion base from the deck. 3M 5200 is, in fact, a construction adhesive, not a sealant. A construction adhesive bonds two surfaces with a near-permanent bond; a sealant keeps water out. Strength is not the first requirement for a good sealant to bed deck hardware held in place by mechanical fasteners. Understanding what really matters will help you to pick the best alternative.

What Really Matters

A good marine sealant for bedding deck fittings must be waterproof, of course, but it must also be flexible, UV resistant, and, ideally, chemical resistant (fuel, bleach, and other solvents do find their way on deck occasionally). It should not be so strong that the deck hardware can't be removed if necessary, or so tenacious that it leaves a residue that prevents other sealants from adhering. From an aesthetic perspective, it should resist dirt and not age in an unsightly way.

If you can't find butyl tape or have more faith in a curing sealant, Boatlife Life-Calk polysulfide, applied as described in the article, "Re-Bedding Deck Fittings", will be your best choice for bedding metal and wood (but not ABS or Lexan) because of its excellent chemical resistance and emphasis on sealing rather than bonding. The polyethers accommodate movement better than the polysulfides and have better UV resistance, and 3M 4000 UV is even compatible with plastic. But the stronger bond will be problematic if disassembly is required.


Sikaflex 295 UV polyurethane is another alternative to polysulfide. A combination of superior UV resistance, liberal elongation, and compatibility with plastic (in concert with a primer) makes this a versatile sealant. Its advantage over 3M 4000 UV and over all of the other polyurethane products is its lower strength, which makes future disassembly/removal easier. You can, of course, use any of the other polyurethanes, but unless your intent is to bond rather than seal, these are choices you may come to regret.

The alternative for sealing framed windows, if you skip butyl tape, is silicone sealant. Bonded windows require a structural glazing silicone such as Dow 795 (or Sikaflex 295 UV polyurethane protected with a special primer). Beyond portlights and specialized uses, you'll save yourself grief if you keep silicone sealant away from the deck and hull.

Don't just pick up any tube of marine sealant from your favorite chandlery and set to work. If you want to make sure that leak doesn't come back, take the time to select the best sealant for the job. While it may not be as much fun as playing with drills and bolts, choosing the right sealant is every bit as important as the proper technique to make that fitting watertight

There's much to like about butyl tape for bedding deck hardware. It takes a bit longer to apply, but it's easy, relatively mess-free, and the job is finished as soon as the nuts are tightened — no waiting for the sealant to cure. It's the best choice for framed portlights, but should be avoided where it may come into contact with chemicals. It does not cure, so butyl tape properly installed should remain watertight for decades, yet it's also the easiest to dismantle.


0

KEEP IT FASTENED

Posted On: August 06, 2018

How To Use The Right Fastener

Based on an article by Don Casey

Anything you want to attach to your boat has to be fastened in some way. Today we have astounding glues that are stronger than the materials they bond, and some tapes are capable of joining railroad cars. Most of the time, though, mechanical fastening will be the attachment method of choice. Metal fasteners set the bar for strength, offer unmatched longevity, and most can be disassembled without destruction. Select wisely and install carefully to ensure your fasteners hold to their maximum strength.

Selecting the right fastener (see below) begins by assessing the load that will be placed on it. Any metal fastener will hold well against a sideways (shear) force. But with a tensile force pulling the fastener straight out, holding strength becomes increasingly dependent on the threads (or formed head in the case of rivets) holding the fastener in place. The load on lifting and towing eyes is almost entirely tensile — it is trying to stretch the fasteners or pull them from their holes. When the tide goes out, docklines start to tug upward on cleat fasteners. Pedestal seat bases pry up mightily on their forward fasteners, then on their aft ones as your body weight shifts in a chop.

In general, the weak link in the attachment of a fastener is the internal threads that the fastener's external threads engage. Threads cut by wood screws into wood, or by sheet-metal screws into fiberglass, lack the strength, consistency, and durability that machined threads inside a metal nut or other thick metal component can provide. Bolts or machine screws must be used to secure any component or piece of hardware essential to boat function and/or safety that might experience a load that will or could pull or pry it from the boat. In addition to nuts on the backside of the fitting, through-bolt mounting should include a strong backing plate made out of aluminum or stainless steel or, at the very least, heavy fender washers to spread the load.

The most common mistake when installing fasteners is to overtighten them, which either strips the threads or breaks the fastener. A stainless-steel 10/24 bolt has a maximum torque of less than 2 foot-pounds (22.8 inch-pounds), a force you can apply curling your fingers. A 1/4-20 bolt shouldn't be torqued beyond about 6 foot-pounds (75.8 inch-pounds). Even the 21-foot-pound maximum torque of a 3/8-24-bolt requires only wrist strength to apply. With regularly selling torque wrenches for under $10, there's no reason not to own one of these tools if just to gauge your own strength. Without long experience or the guidance of a torque wrench, snug threaded fasteners, then stop. The keys to fastener reliability are to select wisely; use lubricant, insulator, or thread locker when called for; install carefully; and tighten gently. Do these four things every time and all your fasteners will deliver their maximum strength

0

CHARGING YOUR BOATS BATTERIES

Posted On: August 03, 2018


A digital multimeter is a handy tool to accurately check the charge of your battery. Set the meter to DC volts. The meter likely has different ranges, but the 20-volt scale is probably appropriate for typical marine batteries. Place the probes onto the battery terminals and note the reading. A slight difference in the numbers can have a big effect on the battery performance.

  • 12.65 to 12.77 volts indicates your battery has a full charge
  • 12.45 to 12.54 volts means you have a 75-percent charge
  • 12.24 to 12.29 volts is 50-percent charged
  • 11.99 to 12.06 volts is 25-percent charged
  • 11.75 to 11.89 volts means your battery is dead

Batteries must be correctly mounted for them to give safe and effective performance. A shifting battery could contact some metal part of the boat and cause a short circuit that starts a fire. All batteries should be secured in an acid-proof box or tray to contain spills. A box also isolates the battery from physical harm that could split the case and cause acid to leak out. Positive terminals should be covered as well. Most boxes have covers that serve this purpose.

Charging Batteries

The best thing that you can do for your batteries is to keep them properly charged. All batteries will self-discharge if left to sit. The discharge rate varies depending on the type, size, and age of the battery. A lead-acid battery may lose 5 percent of its charge per month, so it's important that a battery not used for some time, over the winter for instance, is periodically charged to bring it up to full capacity.

How a battery is charged is critical to its health and longevity. Both overcharging and undercharging will reduce the battery's lifespan and degrade its performance. If you use a cheap auto-parts-store battery charger, there's a chance you could severely overcharge or "cook" off the electrolyte, ruining the battery. BoatUS recommends a marine smart battery charger, which is designed for permanent installation, can safely be left connected to the batteries, and will automatically reduce the charge to avoid overcharging.

0

STAYING CONNECTED OFFSHORE

Posted On: July 30, 2018

Stay Connected Beyond Cell Coverage

Based on an article by Mark Corke for BoatUS

KVH delivers higher data speed, greater Internet range offshore with its new TracPhone LTE-1.

Using the KVH TracPhone LTE-1 aboard

Everyone wants to stay connected these days, and while regular cellphone coverage continues to get better and more reliable, those who head 20-miles offshore quickly find themselves out of range.

Realizing that even coastal cruisers want to stay in touch, KVH, one of the leaders in marine communications technology, launched the TracPhone LTE-1. Unlike the satellite communications technology that is the bedrock of KVH's business, TracPhone LTE-1 is a cellular product, which the manufacturer says will keep you connected up to 20 miles offshore.

"The TracPhone LTE-1 is a game changer for boaters who want to stay connected with HD streaming, video chatting, and more," says Martin Kits van Heyningen, KVH's chief executive officer. "We've taken the same end-to-end approach we use with our satellite-based products to ensure the best experience for our customers by providing everything they need — from hardware to airtime — to enjoy fast Internet access on the boat."

The outward appearance of the LTE-1 is the familiar KVH dome, albeit in a smaller package that measures just over 12 inches in height and width, so it should be an easy, unobtrusive fit on almost any boat. Under the hood are dual antennas, modem, GPS, and Wi-Fi router so you won't clutter up in the inside of the boat with hardware.

Data speeds are reported to be 100Mbps download and 50 Mbps upload — fast enough to stream video content and post your favorite boating pictures to social media

0

FIBERGLASS DRILLING NO NO'S

Posted On: July 27, 2018


Drilling Into Fiberglass No Nos

Drilling holes through cored decking without taking the proper precautions is asking for trouble. Leaky lifeline-stanchion mounting bolts, (most likely due to failed caulking) have allowed water to enter the cored decking beneath. The mounting nuts are drawn so tightly they're crushing the panel, no doubt an attempt by the owner to not only keep the stanchion from wiggling, but also to try and stop the leak (note the inadequately sized washers and lack of a backing plate).

Photo of good and bad examples of stanchion install

No backing plate, nuts tightened too far, and incorrectly sized washers are all leading to a leaky lifeline stanchion, right. The photo on the left shows how it should be done.

In a perfect world, your boat's manufacturer has anticipated where all deck penetrations are necessary and has "de-cored" these areas by reverting to solid fiberglass, allowing you to mount hardware without drilling into the core. But in the case of new installations, your chances are slim to none that any of these areas will coincide with whatever aftermarket doodad you want to mount, meaning you're going to have to do it the hard way. Anytime you screw or drill through a cored panel, the first rule is properly sealing the core against moisture entry.

0

BOTTOM PAINT HALOING

Posted On: July 23, 2018


Bottom Paint Haloing

"Haloing" of bottom paint is sometimes observed on boats with bonding systems that are in poor condition or are providing overprotection of the bronze components. It's most prevalent with vessels using black or other dark-colored bottom paint and is more common with certain brands containing higher amounts of copper. If found on your boat, inspect your bonding system connections (if you have one) to ensure they are clean, tight, and corrosion free. Another good idea is to conduct a corrosion survey to ensure proper galvanic protection is being provided.

0