Leaving your boat in a slip doesn't have to leave your brain tied in knots — here's how.
Tying up at a dock is one of those techniques that's most elegant when it's done simply. The trick is to get the fewest number of docklines serving the greatest number of functions. And doing that means paying attention to three things: Strong points, a good hitch, and the right combination of lines.
"Notice anything different?" the skipper bellowed. The houseboat's rail — we'd tied our stern line to it — was now just a mangled pretzel of aluminum, thoroughly separated from the rest of the boat. The boat's builder had secured the rail to the deck with nothing but short self-tapping screws. The lesson: Make sure all your lines are tied to a strong point — both on the boat and on the dock. Usually this is a cleat, but a strong point may be a ring or an eye; it may be a bollard or a bitt; it may be a piling. The important thing is that whatever you tie off to needs to be stronger than the loads coming from the docklines. A good cleat or other strong point will be bolted through the hull or decking, with robust fasteners finished off with a nut, fender washer, and backing plate on the underside to spread the load. The lifting or towing eyes on a runabout are good strong points.
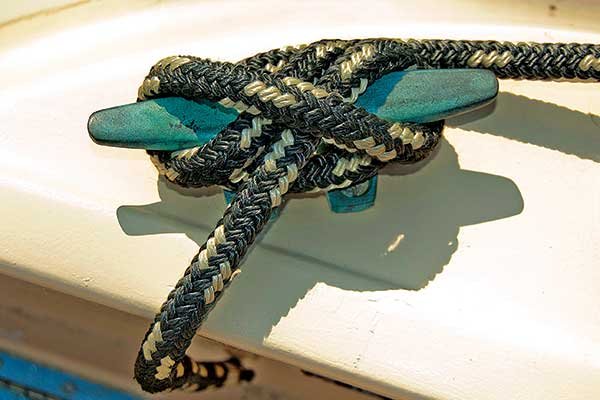
The Cleat Hitch
Walk down any dock, and you're bound to see a bad cleat hitch — either a tangled mess of excessive line or a series of insufficient loops that will slip apart under strain. Among charter fleets, the number of dinghies lost to bad cleat hitches is beyond counting.
The trick to a good cleat hitch is to keep it simple: Three turns around the cleat's horns; no more, no less. Pass the line once completely around the cleat's base (under the horns); next, make a figure-8 over the two horns; finally, turn the line under itself to make a half hitch.
Often you'll see people layer on the turns, crossing and recrossing the cleat. Extra turns provide no extra holding strength. None. What's worse, they may make it more difficult to untie if things start moving fast.
Docklines — Tying Up Alongside
Docklines limit a boat's motion. That motion can be either in a fore-and-aft direction or a transverse direction — or a combination of the two. The key is to identify the fewest number of docklines that will limit the boat's motion in every direction. Breast lines (lines that come off the boat at a right angle to it) limit how much the boat can move toward or away from the dock. Springlines (lines that run at a shallow angle along some portion of the length of the boat) limit how much the boat can move forward or backward. Bow lines and stern lines (lines from the bow forward to the dock or from the stern aft to the dock) may do some of each.
A glossary of all possible lines.
Figure A shows virtually all the possible docklines you could use — but hopefully not all at once! Docklines are named according to this convention: [direction from boat] [position on boat] [line's function]. So, a "forward quarter spring" is a line that runs forward to the dock from the cleat at the boat's stern quarter; it prevents the boat from moving astern. An "after spring" is a dockline that leads aft; it limits the boat's forward motion.
But when tying up the goal is to use only the ones needed to safely secure the boat.
For a short stop alongside a dock, you should be able to tie up with just three lines (Figure B). Breast lines have a disadvantage in places with tidal ranges or even wakes from passing boats: being so short, they limit a boat's vertical motion. Even stepping on the gunwale to get out of a small boat may strain a breast line. The best combination of docklines is typically at least one springline, plus a bow line and a stern line. If you run the bow line forward and the springline aft, you'll limit the boat's motion in both directions yet still allow for some motion up and down. Likewise, run the stern line aft from the side of the boat farthest from the dock. This will limit both transverse and forward motion. Place good fenders between the boat and the dock, then tension up the lines. For heavier weather and longer stays, add a second springline in the opposite direction of the first.
Docklines — Tying Up In A Slip
Tying up in a slip typically works best with four docklines: two bow lines, and two stern lines (Figure C). As for leaving room for the water to move up and down, the same caveats still apply. Try to avoid breast lines. Instead, run your bow lines forward a bit and cross your stern lines. This way, all the lines are working together to limit motion forward, aft, and side to side. If your boat is over 35 feet or you expect lots of wind or current, add a set of spring lines.